
.NET6 C#を使って、 DynamoDB テーブルの詳細情報を取得します。
dotnet new console の後、 nugetからAWSSDK.DynamoDBv2パッケージをAddします。
dotnet add package AWSSDK.DynamoDBv2 --version 3.7.3.26
パッケージ内のDescribeTableAsync()を使えば、 テーブルの詳細情報を取り出せます。
DynamoDB上に「test-table」テーブルを作成
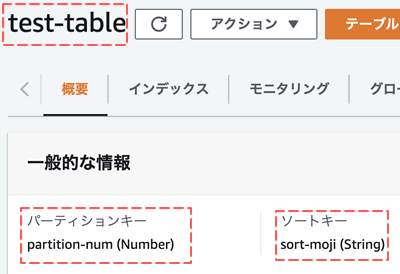
パーティションキー = partition-num
ソートキー = sort-moji
このDynamoDBで作成したテーブルの詳細情報を.NET6 C#を使って取り出します
using Amazon;
using Amazon.DynamoDBv2;

var dynamodb = new AmazonDynamoDBClient("アクセスキー","シークレット", RegionEndpoint.APNortheast1);
try{
    var describeTask = dynamodb.DescribeTableAsync("test-table");
    var describe = describeTask.Result;
    Console.WriteLine("テーブルARN={0}",describe.Table.TableArn);
    foreach (var att in describe.Table.AttributeDefinitions){
        Console.WriteLine("AttributeDefinition KeyName={0} Type={1}",att.AttributeName,att.AttributeType.Value);
    }
    Console.WriteLine("テーブル作成日={0}", describe.Table.CreationDateTime.ToString());
    Console.WriteLine("総レコード={0}", describe.Table.ItemCount);
    Console.WriteLine("TableSizeBytes={0}", describe.Table.TableSizeBytes);
} catch(Exception _e){
    Console.WriteLine(_e);
}
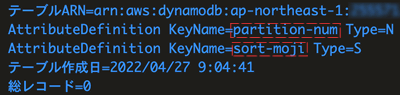
テーブルの、 作成日・総レコード数・テーブルの サイズなども取得できています

